I have been an avid scrapbooker for many years. Sadly, since we have moved to our new home and having more pressing things to take care of, I have to admit that my hobby has been put on the back burner. It does not help that priorities always seem to change!
That said, I have felt the creative bug tugging at me for quite a few months now and it was time for me to create a "my space" of sorts, where I could go to and lock myself again into a world filled with papers, pretty ribbons and digital goodies!

Originally I was hoping to create a scrapbooking studio in our finished basement...That was until I opted for a food and household supplies stockpile instead (it;s a coupon thing)!
As I mentioned in my previous post on Office Organization, our office closet had remained an unfinished project. It basically stood there, doorless (the door was removed in order to fit more stuff in it), without much attention paid to it. Since the basement was pretty much out of the question, I have decided that this closet would be my new prime real estate in the house!
Here is the closet, in its awful BEFORE state, though partially empty. I believe that we all have one of those closets in our home where stuff simply gets shoved in. I realize that this mess is the result of unmade decisions and My Great Challenge is all about changing the "I'll do it later" habit. Later is NOW (or else the stuff will spread to other areas of your home).
Here, we have all manner of unsightly, useless stuff we all tend to accumulate. You can barely spot our two-drawer file cabinet which, believe it or not, is amazingly well organized inside!
My goal was to maximize the closet space by adding full length shelves. I had planned however, on keeping the filing cabinet inside, only because there is nowhere else for it to go.
Here is the closet, once it was completely emptied out of its junk! The unpainted door you see on the left is the office door, that too will be painted, but not this time around.

For STEP ONE, I installed new shelves using leftover wood from my Lego Table project. I had some 1x3 laying around the garage and used that for shelf stops or rests (whatever they are called). Here I am making sure the stops are leveled before nailing them down.

Here it is once the whole shelf was installed.

The closet already had two shelves installed and I opted for adding an additional two underneath them.
Having made the decision to leave the closet open (no door), I wanted to make sure it would be pleasing to look at. So for STEP TWO I fetched some left over crown molding from our guest bedroom and nailed it to the front of each shelf to add a pretty "skirt." Actually, this turned out to look quite nice!

Here are the four shelves completely assembled.

Time for some paint! In STEP THREE, which turned out to be pretty long, I painted the entire closet, shelves included, with some Valspar Interior Paint in bright white (satin finish).


I guess I got carried away and decided to paint the file cabinet as well! Here it is in its before picture. I cannot remember for the life of me where or when we obtained this cabinet but all I can say is that everyone should have one in their home. This is where all our personal documents are stashed, it locks and keeps everything safe and easy to find.
Paint job completed, it took two coats (three for the file cabinet).


So now it is time to organize my supplies...That job was left for Day Two!
STEP FOUR - ORGANIZING EMBELLISHMENTS
Like many crafters, I have a lot of embellishments. These can be quite expensive and I dare say that moving to partial Digital Scrapbooking has seriously cut down on the expenses. Whatever I have for embellishment right now is all my leftover from previous years. Nevertheless, I had to figure out an inexpensive way (always on a budget here) to store them. First, I found these colorful bins at the Dollar Store.

I then organized my embellishments using medium size Zipploc bags and used common file folder labels to categorize them.

Here they are, along with a bin of chipboard letters.

Armed with my awesome and always handy Label Maker, I labeled each bin accordingly using some Martha Stewart Avery Collection (available at Staples) for label holders. These are great, the adhesive is very strong so make sure you place them exactly where you need them to go since they will stick to the surface immediately and are not that easy to remove in case of a mishap.
In STEP FOUR, I had to find a way to organize my stamps collection. I have a LOT and most were gifts from my Mother-in-Law. Stamps are tricky to organize, I find that you never remember what stamp you have or when you remember, you simply spend too much time looking for it, it cuts the fun out of any craft project. So this is what I did and I believe this to be an awesome tip!
First, I brought all the stamps back from the basement....

I then categorized them using plastic shoe boxes from the Dollar Store...

Here are my categories:


I used a single binder ring to attach all the sheet protectors together and used one of the closet nails as a hook to hang the catalog where I can easily find it, voila!

In STEP FIVE I took on the grueling task of finding a home for my very large collection of paper supplies.
Here, I have some standard papers, mostly 12x12 since it is my preferred size, and some small stacks.
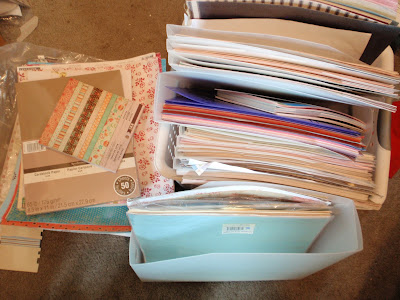
I found a white plastic crate in the basement and placed most of my paper in it. However, I do have some specialty or high end papers that I want to protect as much as I can. These are mostly Basic Grey and Cosmo Cricket paper collections.
I used these storage containers specifically designed for 12x12 paper. These are pretty old so I am not sure whether they still make them, that said, they are clear and rather sturdy, perfect for storing paper.

The bottom one contains all my brads and eyelets, I did not take a picture of that but they are stored and neatly separated inside a tackle box.
In STEP SIX, it was time to attack the ribbons! Originally I wanted to hang a rod across the closet and have all my spools stored there. However, I felt it would actually look messy and block access to other bins, so instead, I neatly rolled my ribbons and stashed them inside a large box.
Here are the ribbons in their pathetic before state:

For those that were still rolled on a spool, I did combine them and looped them through a longer piece of leftover ribbon to ensure they would all stay together.

As mentioned above, all other ribbons were neatly rolled and tied with a piece of tape.

Are you ready for the big reveal?
This project took two days, so I feel it necessary to showcase yet again the horrible before picture for the sake of contrast and compare!
Here you have it, the before:

And the AFTER picture:
The top shelf is not easy to reach for without a stool, so I basically stashed things that are office related but not necessarily needed all the time such as the attachments to my scanner, photo paper and CD binders.
Quick tour:


A MGC reader asked me whether there was any update on the office organization and sure enough there is! Since I have created this closet, I felt it was a good idea to move my desk around so it is now facing the wall instead of the window. This allowed me to add one more shelf and bring all my scrapbooking reference guides from the basement along with other organized items. On top I keep all my blogging and Digital Scrapbooking reference guides, there are a few go-to psych books like my old college DSM-IV and what not.

In this cute little suitcase, I keep my current Thank You cards so I don't have to rummage through my large stationary and greeting cards container in the basement. Having different Thank You card designs around is a good thing (my own opinion). People have lost the art of saying Thank You - not me!

On the middle shelf I have another one of those three-drawer container and also labeled the drawers to quickly find what I need such as ink for fountain pens, my label maker or the small digital cameras with their chargers and respective SD cards.

You can see my reference binders there too (on the right). Instead of keeping entire craft magazines, I pull out whatever article, layout or advertisement I am interested in and insert it into a sheet protector. Currently I have 4 reference guides:


I hope you have enjoyed the tour and found a few hints and tips to help you stay organized. Though this was a long project, I have to say that all the effort paid off. Not only did I manage yet another round of purging, I also found some "long time no see" items which quickly were relocated to their rightful home, because after all, the secret of staying organized is to have a designated place for all your things, and if you can label it too, all the better!
Thank you for liking, sharing and pinning my blog. Don't forget to find me on Facebook and become of fan of My Great Challenge Facebook page!
Sophia, NJ.
That said, I have felt the creative bug tugging at me for quite a few months now and it was time for me to create a "my space" of sorts, where I could go to and lock myself again into a world filled with papers, pretty ribbons and digital goodies!

Originally I was hoping to create a scrapbooking studio in our finished basement...That was until I opted for a food and household supplies stockpile instead (it;s a coupon thing)!
As I mentioned in my previous post on Office Organization, our office closet had remained an unfinished project. It basically stood there, doorless (the door was removed in order to fit more stuff in it), without much attention paid to it. Since the basement was pretty much out of the question, I have decided that this closet would be my new prime real estate in the house!
Here is the closet, in its awful BEFORE state, though partially empty. I believe that we all have one of those closets in our home where stuff simply gets shoved in. I realize that this mess is the result of unmade decisions and My Great Challenge is all about changing the "I'll do it later" habit. Later is NOW (or else the stuff will spread to other areas of your home).
 |
| A pretty sorry closet filled with unsorted junk — the result of unmade decisions. |
Here, we have all manner of unsightly, useless stuff we all tend to accumulate. You can barely spot our two-drawer file cabinet which, believe it or not, is amazingly well organized inside!
My goal was to maximize the closet space by adding full length shelves. I had planned however, on keeping the filing cabinet inside, only because there is nowhere else for it to go.
Here is the closet, once it was completely emptied out of its junk! The unpainted door you see on the left is the office door, that too will be painted, but not this time around.

For STEP ONE, I installed new shelves using leftover wood from my Lego Table project. I had some 1x3 laying around the garage and used that for shelf stops or rests (whatever they are called). Here I am making sure the stops are leveled before nailing them down.

Here it is once the whole shelf was installed.

The closet already had two shelves installed and I opted for adding an additional two underneath them.
 |
| Since I had run out of 1x3, I used leftover crown molding that was thick enough to rest the shelves on top. You can see that on the left and it worked just fine. |
Having made the decision to leave the closet open (no door), I wanted to make sure it would be pleasing to look at. So for STEP TWO I fetched some left over crown molding from our guest bedroom and nailed it to the front of each shelf to add a pretty "skirt." Actually, this turned out to look quite nice!

Here are the four shelves completely assembled.

Time for some paint! In STEP THREE, which turned out to be pretty long, I painted the entire closet, shelves included, with some Valspar Interior Paint in bright white (satin finish).


I guess I got carried away and decided to paint the file cabinet as well! Here it is in its before picture. I cannot remember for the life of me where or when we obtained this cabinet but all I can say is that everyone should have one in their home. This is where all our personal documents are stashed, it locks and keeps everything safe and easy to find.
 |
| This file cabinet is at least 15 years old! |


So now it is time to organize my supplies...That job was left for Day Two!
STEP FOUR - ORGANIZING EMBELLISHMENTS
Like many crafters, I have a lot of embellishments. These can be quite expensive and I dare say that moving to partial Digital Scrapbooking has seriously cut down on the expenses. Whatever I have for embellishment right now is all my leftover from previous years. Nevertheless, I had to figure out an inexpensive way (always on a budget here) to store them. First, I found these colorful bins at the Dollar Store.

I then organized my embellishments using medium size Zipploc bags and used common file folder labels to categorize them.

Here they are, along with a bin of chipboard letters.

Armed with my awesome and always handy Label Maker, I labeled each bin accordingly using some Martha Stewart Avery Collection (available at Staples) for label holders. These are great, the adhesive is very strong so make sure you place them exactly where you need them to go since they will stick to the surface immediately and are not that easy to remove in case of a mishap.
 |
| Everyone who wants to be and stay organize should have a label maker. It makes a huge difference when everything is labeled! |
In STEP FOUR, I had to find a way to organize my stamps collection. I have a LOT and most were gifts from my Mother-in-Law. Stamps are tricky to organize, I find that you never remember what stamp you have or when you remember, you simply spend too much time looking for it, it cuts the fun out of any craft project. So this is what I did and I believe this to be an awesome tip!
First, I brought all the stamps back from the basement....

I then categorized them using plastic shoe boxes from the Dollar Store...

Here are my categories:
- Flowers
- Animals & Things
- Travel
- Christmas
- Sentiments
- Thank You
- Baby & Hearts
Once I had each box organized, I needed a way to quickly find any stamp quickly and effortlessly. Behold, the Stamp Collection Catalog:

First, I took an actual picture of my stamps (per category) by simply laying them flat on a piece of 8 1/2 x 10 printing paper. I then printed each page (low ink/draft setting), named the category on top of the page and inserted each page into a plastic sheet protector. Here are members of the Flowers Category:

For those very old (1930s) stamps that do not have a picture on top, I quickly stamped them on the same kind of paper...Here are members of the Animals and Things Category:

I used a single binder ring to attach all the sheet protectors together and used one of the closet nails as a hook to hang the catalog where I can easily find it, voila!

In STEP FIVE I took on the grueling task of finding a home for my very large collection of paper supplies.
Here, I have some standard papers, mostly 12x12 since it is my preferred size, and some small stacks.

I found a white plastic crate in the basement and placed most of my paper in it. However, I do have some specialty or high end papers that I want to protect as much as I can. These are mostly Basic Grey and Cosmo Cricket paper collections.
I used these storage containers specifically designed for 12x12 paper. These are pretty old so I am not sure whether they still make them, that said, they are clear and rather sturdy, perfect for storing paper.

The bottom one contains all my brads and eyelets, I did not take a picture of that but they are stored and neatly separated inside a tackle box.
In STEP SIX, it was time to attack the ribbons! Originally I wanted to hang a rod across the closet and have all my spools stored there. However, I felt it would actually look messy and block access to other bins, so instead, I neatly rolled my ribbons and stashed them inside a large box.
Here are the ribbons in their pathetic before state:

For those that were still rolled on a spool, I did combine them and looped them through a longer piece of leftover ribbon to ensure they would all stay together.

As mentioned above, all other ribbons were neatly rolled and tied with a piece of tape.

Are you ready for the big reveal?
This project took two days, so I feel it necessary to showcase yet again the horrible before picture for the sake of contrast and compare!
Here you have it, the before:

And the AFTER picture:
 |
| I do have two unrelated bins at the bottom marked with either my or my husband's name. These are miscellaneous stuff we need to keep but can't really be filed or categorized. |
Quick tour:
 |
| In this picture, you can see what the stamps collection looks like once categorized. I also purchased the lazy Susan pen holder for under $17 at Home Goods. It contains all my special ink markers, mostly the kind one uses for stamping projects. The robin blue boxes on the top left contain either tools or rubber stamping ink pads. |
 |
| I had these fabric boxes for a long time and used them for more specialty tools and all our software. |


A MGC reader asked me whether there was any update on the office organization and sure enough there is! Since I have created this closet, I felt it was a good idea to move my desk around so it is now facing the wall instead of the window. This allowed me to add one more shelf and bring all my scrapbooking reference guides from the basement along with other organized items. On top I keep all my blogging and Digital Scrapbooking reference guides, there are a few go-to psych books like my old college DSM-IV and what not.

In this cute little suitcase, I keep my current Thank You cards so I don't have to rummage through my large stationary and greeting cards container in the basement. Having different Thank You card designs around is a good thing (my own opinion). People have lost the art of saying Thank You - not me!

On the middle shelf I have another one of those three-drawer container and also labeled the drawers to quickly find what I need such as ink for fountain pens, my label maker or the small digital cameras with their chargers and respective SD cards.

You can see my reference binders there too (on the right). Instead of keeping entire craft magazines, I pull out whatever article, layout or advertisement I am interested in and insert it into a sheet protector. Currently I have 4 reference guides:
- Color & Pattern Designs I
- Color & Pattern Designs II
- Inspiring Layout Designs
- Digital Layouts How-To
This is what it looks like inside one of my inspiring Layout Designs reference binder:

So again, I created a special space just for me and I am really enjoying the direct daylight from the window, this is MY SPACE! What do you think?

I hope you have enjoyed the tour and found a few hints and tips to help you stay organized. Though this was a long project, I have to say that all the effort paid off. Not only did I manage yet another round of purging, I also found some "long time no see" items which quickly were relocated to their rightful home, because after all, the secret of staying organized is to have a designated place for all your things, and if you can label it too, all the better!
Thank you for liking, sharing and pinning my blog. Don't forget to find me on Facebook and become of fan of My Great Challenge Facebook page!
Sophia, NJ.


